[Python] 파이썬으로 인스타그램 포스팅하기
- 자아실현 / 파이썬
- 2023. 1. 1.
1. 들어가며
파이썬, 셀레늄을 이용하여 인스타그램 포스팅을 해보겠습니다. 여기서는 PC에서 접속하는 것 말고, 모바일 브라우저에서 접속하는 것을 구현하기 때문에 사진을 한번에 한장만 올릴 수 있습니다.
학습용으로 이용해 주세요.
1) 준비물
pip install webdriver-manager (크롬드라이버 다운/관리)
pip install -U selenium (웹브라우저 컨트롤, 4.x 버전 사용)
-> 3.x 사용해야 하는 경우 웹드라이버 실행 부분 코드 수정하여 사용
pip install pyautogui (키보드 컨트롤)
2) 주의 사항
여러번 로그인 시도하면 일정 시간동안 블록 당하므로 조심할 것
주피터 노트북으로 짜는 것이 편함 -> 여기서도 주피터 노트북으로 코드를 짭니다.
2. 방법
1) 브라우저 실행하기
필요한 라이브러리 한방에 임포트
from webdriver_manager.chrome import ChromeDriverManager
from selenium.webdriver.chrome.options import Options
from selenium.webdriver.chrome.service import Service
from selenium import webdriver
from selenium.webdriver.common.by import By

import time
import pyautogui
셀레늄을 이용해 웹드라이버를 여는 것은 다른 게시물과 동일하나, 여기서는 유저에이전트를 별도로 설정해서 휴대폰으로 접속하는 것처럼 보이도록 합니다. 휴대폰으로 구글에 'my user agent'를 검색하면 나오고, 아니면 그냥 'iphone user agent'를 검색하면 나오는 것들 중 맘에 드는 것으로 고르시면 됩니다. 다만 PC 환경을 선택하시면 안 됩니다.

웹드라이버를 세팅하고, 브라우저를 열어보겠습니다
options = Options()
user_agent = "--user-agent=Mozilla/5.0 (Linux; Android 12; SM-G998U Build/SP1A.210812.016; wv) " \
             "AppleWebKit/537.36 (KHTML, like Gecko) Version/4.0 Chrome/102.0.5005.78 Mobile Safari/537.36"
options.add_argument(user_agent)
driver = webdriver.Chrome(service=Service(ChromeDriverManager().install()), options=options)
driver.set_window_size(360, 640)
빈 크롬 창이 열릴텐데, 인스타그램 로그인 페이지에 접속합니다.
url = 'https://www.instagram.com/accounts/login/?source=auth_switcher'
driver.get(url)
2) 로그인하기
로그인 페이지에서 아이디를 입력하는 곳은 input 태그로 되어있는데, 해당 페이지에 input 태그는 딱 두개가 있고, 각각 아이디와 비밀번호를 입력하는 곳입니다. 따라서 type을 이용해서 두 요소를 찾아내고 입력합니다.
username = "insta_post_lab" #본인 인스타그램 아이디 입력
password = "insta_post_lab1" #본인 인스타그램 비밀번호 입력

time.sleep(5)
driver.find_element(By.CSS_SELECTOR, "input[type='text']").send_keys(username)
driver.find_element(By.CSS_SELECTOR, "input[type='password']").send_keys(password)
로그인 버튼은 '로그인'이라는 텍스트를 포함하는 div 태그를 찾아서 클릭합니다
driver.find_element(By.XPATH, "//div[contains(text(), '로그인')]").click()-> 만약에 로그인이 안 된다면, 위의 user agent가 모바일 기기로 제대로 설정되어있는지 확인해주세요.
정상적으로 로그인 되면 아래와 같이 홈 화면에 인스타그램을 추가하거나, 알림 설정 등에 대한 알람이 뜨는 경우가 있습니다.

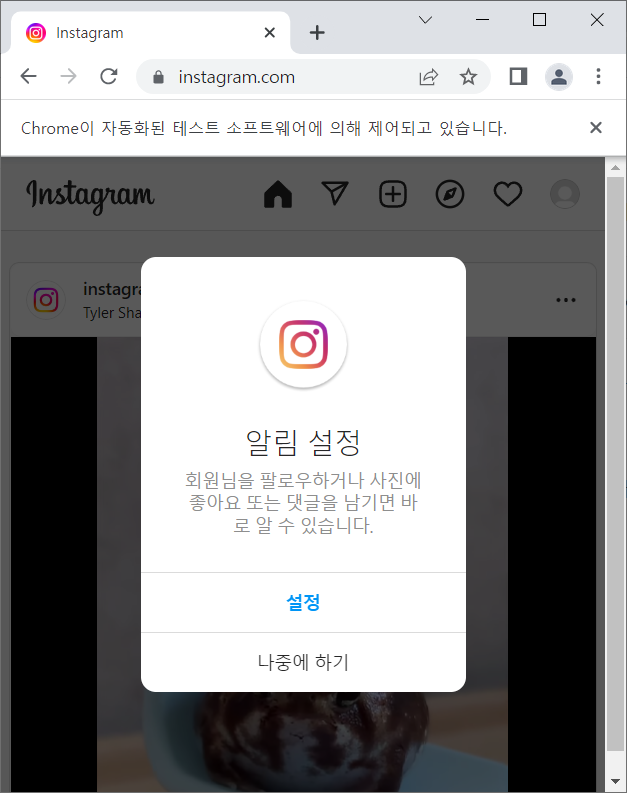
이런 창들을 다 넘어가야 하는데, 해당 텍스트가 포함된 버튼이 있으면 누르는 if 문을 이용하겠습니다.
# 로그인 정보 저장
time.sleep(5)
button = driver.find_elements(By.XPATH, "//*[contains(text(), '나중에 하기')]")
if len(button) > 0:
    button[0].click()
time.sleep(5)

# 홈 화면에 추가
time.sleep(5)
button = driver.find_elements(By.XPATH, "//*[contains(text(), '취소')]")
if len(button) > 0:
    button[0].click()

# 알림 설정
time.sleep(5)
button = driver.find_elements(By.XPATH, "//*[contains(text(), '나중에 하기')]")
if len(button) > 0:
    button[0].click()
로직은 다 동일합니다. XPath를 이용해서, 특정 버튼이 있을 경우 클릭하고 넘어갑니다.
3) 게시물 올리기

새 게시물 올리기 버튼을 클릭해줍니다.
검사 도구(Ctrl+Shift+C)로 확인해보면 해당 버튼의 aria-label이 "새로운 게시물"인 것을 알 수 있습니다.

time.sleep(5)
driver.find_element(By.CSS_SELECTOR, "[aria-label='새 게시물']").click()

그러면 위와 같이 파일 선택을 위한 '열기'창이 뜨는데, 해당 창은 셀레늄에서 조작이 불가합니다. 여기서는 pyautogui를 이용하여 원하는 파일의 경로를 입력합니다.
'열기'창이 실행되면 기본적으로 커서가 파일 이름을 입력하는 곳에 위치해 있습니다. 따라서 아래와 같은 방식으로 이미지 경로를 입력할 수 있습니다.
주의사항: pyautogui는 키보드를 조작하는 것이므로 꼭 '열기'창이 활성화 된 상태여야 합니다.
time.sleep(5)
pyautogui.write(r'C:\Users\infin\PycharmProjects\insta\bg-puppy.jpg')
pyautogui.press('enter')
저는 폴더를 입력하고 엔터를 눌러서 해당 폴더로 먼저 이동 후 파일 이름을 입력하는 방식으로 입력을 하겠습니다.
뒤에서 함수로 만들어 루프를 돌릴 때 조금 더 편하게 사용하기 위함입니다. 위 코드 대신 아래 코드를 사용합니다.
time.sleep(5)
pyautogui.write(r'C:\Users\infin\PycharmProjects\insta')
pyautogui.press('enter')

time.sleep(1)
pyautogui.write('bg-puppy.jpg')
pyautogui.press('enter')
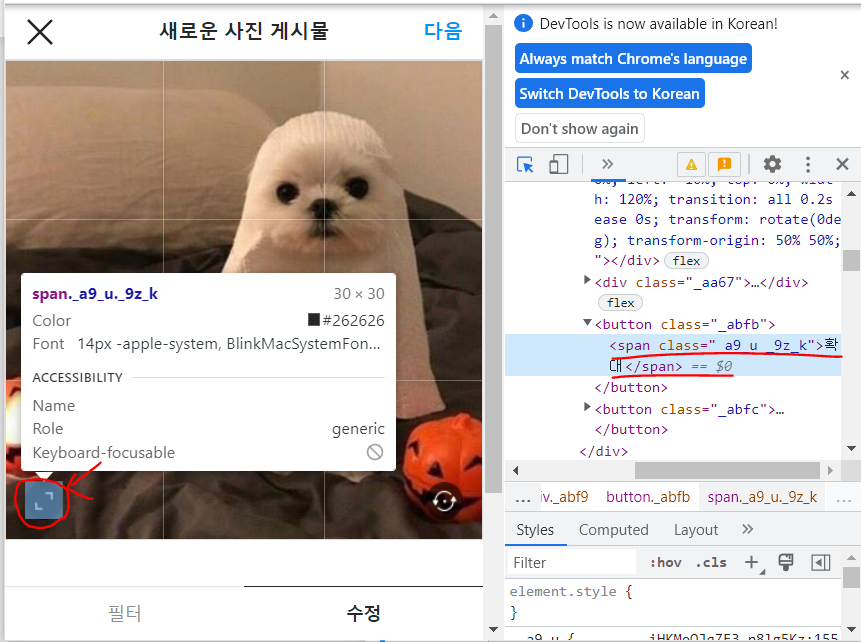
파일을 성공적으로 선택하고 나면 위와 같이 사진을 편집할 수 있는 창으로 이동합니다. 사진 모양이 정사각형이 아닐 경우 '확대' 버튼이 생기므로, 해당 버튼을 클릭해서 사진이 정사각형으로 잘리지 않고 원본 모양으로 업로드가 될 수 있도록 하겠습니다.
위에서 팝업을 다루던 것과 같은 방식으로 시도했으나, 오류가 발생합니다.
# 작동이 될 때도 있지만 안 될 때도 있음
time.sleep(5)
button = driver.find_elements(By.XPATH, "//*[contains(text(), '확대')]")
if len(button) > 0:
    button[0].click()

따라서 아래와 같이 자바스크립트를 이용합니다.
time.sleep(5)
button = driver.find_elements(By.XPATH, "//span[contains(text(), '확대')]")
if len(button) > 0:
    driver.execute_script("arguments[0].click();", button[0])
그리고 다음 버튼을 눌러줍니다.
time.sleep(5)
button = driver.find_elements(By.XPATH, "//button[contains(text(), '다음')]")
button[0].click()
게시물 내용을 입력하는 페이지로 이동합니다.
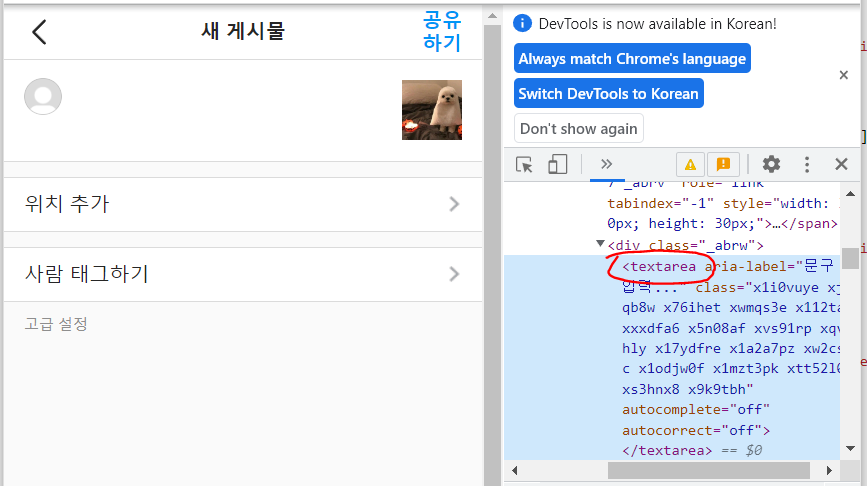
게시물의 내용을 입력하는 곳은 textarea 입니다만, 찾아보면 textarea가 두 개가 있습니다. 첫 번째 것이 내용을 입력하는 곳이고, 두 번째 것은 히든으로 숨겨져 있습니다. 따라서 첫번째 textarea를 선택하여 내용을 입력합니다.
contents="contents of the post"

time.sleep(5)
field = driver.find_elements(By.TAG_NAME, 'textarea')[0]
field.click()
field.send_keys(contents)
그리고 공유하기 버튼을 눌러주면 게시물이 게시됩니다.
time.sleep(5)
button = driver.find_elements(By.XPATH, "//button[contains(text(), '공유하기')]")
button[0].click()
게시물이 올라가고 나면 아래와 같이 알림 설정에 대한 창이 뜨는데, 똑같은 방식으로 처리하면 됩니다.
# 알림 설정
time.sleep(5)
button = driver.find_elements(By.XPATH, "//*[contains(text(), '나중에 하기')]")
if len(button) > 0:
    button[0].click()

다 끝나고 나면 성공적으로 업로드가 된 게시물을 볼 수 있습니다.

여기까지 전체 코드를 정리하면 아래와 같습니다.
일부 변수는 맨 위로 뺐습니다.
4) 전체 코드
from webdriver_manager.chrome import ChromeDriverManager
from selenium.webdriver.chrome.options import Options
from selenium.webdriver.chrome.service import Service
from selenium import webdriver
from selenium.webdriver.common.by import By
import time
import pyautogui


username = "insta_post_lab"
password = "insta_post_lab1"
path = r'C:\Users\infin\PycharmProjects\insta'
filename = 'bg-puppy.jpg'
contents="contents of the post"

options = Options()
user_agent = "--user-agent=Mozilla/5.0 (Linux; Android 12; SM-G998U Build/SP1A.210812.016; wv) " \
             "AppleWebKit/537.36 (KHTML, like Gecko) Version/4.0 Chrome/102.0.5005.78 Mobile Safari/537.36"
options.add_argument(user_agent)
driver = webdriver.Chrome(service=Service(ChromeDriverManager().install()), options=options)
driver.set_window_size(360, 640)

url = 'https://www.instagram.com/accounts/login/?source=auth_switcher'
driver.get(url)

time.sleep(5)
driver.find_element(By.CSS_SELECTOR, "input[type='text']").send_keys(username)
driver.find_element(By.CSS_SELECTOR, "input[type='password']").send_keys(password)
driver.find_element(By.XPATH, "//div[contains(text(), '로그인')]").click()

# 로그인 정보 저장
time.sleep(5)
button = driver.find_elements(By.XPATH, "//*[contains(text(), '나중에 하기')]")
if len(button) > 0:
    button[0].click()
time.sleep(5)

# 홈 화면에 추가
time.sleep(5)
button = driver.find_elements(By.XPATH, "//*[contains(text(), '취소')]")
if len(button) > 0:
    button[0].click()

# 알림 설정
time.sleep(5)
button = driver.find_elements(By.XPATH, "//*[contains(text(), '나중에 하기')]")
if len(button) > 0:
    button[0].click()

time.sleep(5)
driver.find_element(By.CSS_SELECTOR, "[aria-label='새 게시물']").click()

time.sleep(5)
pyautogui.write(path)
pyautogui.press('enter')

time.sleep(1)
pyautogui.write(filename)
pyautogui.press('enter')

time.sleep(5)
button = driver.find_elements(By.XPATH, "//span[contains(text(), '확대')]")
if len(button) > 0:
    driver.execute_script("arguments[0].click();", button[0])

time.sleep(5)
button = driver.find_elements(By.XPATH, "//button[contains(text(), '다음')]")
button[0].click()

time.sleep(5)
field = driver.find_elements(By.TAG_NAME, 'textarea')[0]
field.click()
field.send_keys(contents)

time.sleep(5)
button = driver.find_elements(By.XPATH, "//button[contains(text(), '공유하기')]")
button[0].click()

# 알림 설정
time.sleep(5)
button = driver.find_elements(By.XPATH, "//*[contains(text(), '나중에 하기')]")
if len(button) > 0:
    button[0].click()
3. 코드 다듬기
클래스/함수를 이용하여 반복 작업에 좀 더 용이하도록 코드를 수정하겠습니다.
아래와 같은 총 12장의 조각 사진을 반복하여 업로드하고자 합니다.

아래는 업로드 후 결과물입니다.

전체 코드
from webdriver_manager.chrome import ChromeDriverManager
from selenium.webdriver.chrome.options import Options
from selenium.webdriver.chrome.service import Service
from selenium import webdriver
from selenium.webdriver.common.by import By
import time
import pyautogui


class Insta:
    def __init__(self):
        self.driver = None

    def open_browser(self):
        options = Options()
        user_agent = "--user-agent=Mozilla/5.0 (Linux; Android 12; SM-G998U Build/SP1A.210812.016; wv) " \
                     "AppleWebKit/537.36 (KHTML, like Gecko) Version/4.0 Chrome/102.0.5005.78 Mobile Safari/537.36"
        options.add_argument(user_agent)
        self.driver = webdriver.Chrome(service=Service(ChromeDriverManager().install()), options=options)
        self.driver.set_window_size(360, 640)

        return self.driver

    def login(self, username, password):
        url = 'https://www.instagram.com/accounts/login/?source=auth_switcher'
        self.driver.get(url)

        time.sleep(3)
        self.driver.find_element(By.CSS_SELECTOR, "input[type='text']").send_keys(username)
        self.driver.find_element(By.CSS_SELECTOR, "input[type='password']").send_keys(password)
        self.driver.find_element(By.XPATH, "//div[contains(text(), '로그인')]").click()

        # 로그인 정보 저장
        time.sleep(3)
        button = self.driver.find_elements(By.XPATH, "//*[contains(text(), '나중에 하기')]")
        if len(button) > 0:
            button[0].click()
        time.sleep(5)

        # 홈 화면에 추가
        time.sleep(3)
        button = self.driver.find_elements(By.XPATH, "//*[contains(text(), '취소')]")
        if len(button) > 0:
            button[0].click()

        # 알림 설정
        time.sleep(3)
        button = self.driver.find_elements(By.XPATH, "//*[contains(text(), '나중에 하기')]")
        if len(button) > 0:
            button[0].click()

    def post(self, path, filename, text):
        time.sleep(3)
        self.driver.find_element(By.CSS_SELECTOR, "[aria-label='새 게시물']").click()

        time.sleep(3)
        pyautogui.write(path)
        pyautogui.press('enter')

        time.sleep(1)
        pyautogui.write(filename)
        pyautogui.press('enter')

        time.sleep(3)
        button = self.driver.find_elements(By.XPATH, "//button[contains(text(), '확대')]")

        time.sleep(3)
        button = self.driver.find_elements(By.XPATH, "//span[contains(text(), '확대')]")
        if len(button) > 0:
            self.driver.execute_script("arguments[0].click();", button[0])

        time.sleep(3)
        button = self.driver.find_elements(By.XPATH, "//button[contains(text(), '다음')]")
        button[0].click()

        time.sleep(3)
        field = self.driver.find_elements(By.TAG_NAME, 'textarea')[0]
        field.click()
        field.send_keys(text)

        time.sleep(3)
        button = self.driver.find_elements(By.XPATH, "//button[contains(text(), '공유하기')]")
        button[0].click()

        # 알림 설정
        time.sleep(5)
        button = self.driver.find_elements(By.XPATH, "//*[contains(text(), '나중에 하기')]")
        if len(button) > 0:
            button[0].click()

    def quit(self):
        self.driver.quit()


if __name__ == "__main__":
    username = "insta_post_lab"
    password = "insta_post_lab1"

    bot = Insta()
    bot.open_browser()
    bot.login(username, password)

    import os
    img_list = os.listdir(r"C:\Users\infin\PycharmProjects\insta\img_split")
    for img in reversed(img_list):
        bot.post(r"C:\Users\infin\PycharmProjects\insta\img_split", img, f"file name: {img}")

    time.sleep(30)
    bot.driver.quit()
설명
Insta 클래스를 생성하여 login 메서드와 post 메서드를 만들었습니다. post 메서드는 사진이 위치한 폴더, 파일 이름, 내용을 인수로 받습니다. 위의 코드를 실행하면, "C:\Users\infin\PycharmProjects\insta\img_split" 폴더 안에 있는 파일을 역순으로 루프를 돌아서 하나씩 업로드를 하도록 했습니다.
4. 마무리
부족한 부분이 많지만 단순하게 사진 한장씩 포스팅 하는 데는 나름 쓸만한 것 같습니다.


